Pokazywanie postów oznaczonych etykietą Distress Spray Stain. Pokaż wszystkie posty

środa, 14 listopada 2018

Alterowane pudełko - TUTORIAL


Cześć kochani ! Dziś mam dla was efekt mojej ekspresji z mgiełkami Distress i pastą do złoceń.


Hey there ! Today again it's about my expression with Distress mists and a gilding paste. 


Zapraszam na film krok po kroku, gdzie zobaczysz jak szybko i przyjemnie można alterować drewno.

I invite you to a step-by-step video, where you will see how quickly and nicely you can change wood.


Szczegóły: / Details:


Ściskam/ Hugs


Użyłam/ I used:

Nagrzewnica Heat It Craft Tool - Ranger - PRZEDSPRZEDAŻ
Glossy Accents 59ml
Pasta pozłotnicza - Renesans - Ricg Gold


sobota, 18 marca 2017

Retro Inspiracje: Bałaganiarskie płótno / Retro Inspirations: Messy canvas


Cześć!!!
Dziś chcę Wam pokazać nowe płótno. Do jego stworzenia wykorzystałam kolekcję Prima - Salvage District i dodałam koloruInka- Golhd, Distress Spray Stain i Distress Crayons (peacock feathers). Płótno jest w pięknych kolorach, a jego kompozycja jest bałaganiarska, bardzo mediowe i warstwowa. 

Hi!!!
Today I'd like to share a new canvas. I made it using the collection Prima - Salvage District and I added colors with Inka- Gold, Distress Spray Stain and Distress Crayons (peacock feathers), and I was able to create a glamorous, rich background.
The canvas is in beautiful colors and the composition is messy, very mixed media and layered.


Nie mogło zabraknąć gazy, sizalu, mgiełek Distress Spray Stain,  tekturek i stempli od Finnabair i Prima.
I couldn’t do without some gauze, sisal, Distress Stain Sprays mists, chipboards and stamps from Finnabair and Prima. 


Ponieważ uwielbiam teksturę, dodałam teksturową pastę drobnoziarnistą.
As I'm a huge lover of texture, I added  paste with a sand texture effect.


 Ściskam/ Hugs, 
Karolina 


Użyłam: / I used:

Tusz Archival - Jet Black


Klej - Aleene's Always Ready Original Tacky Glue


poniedziałek, 13 marca 2017

Retro Tutki: Pożegnalne LO Pauliny / Retro Tutorials: Paulina's farewell layout

Hej Wszystkim. Nowy skład Teamu ogłoszony, przyszedł więc czas na pożegnanie. 
Ostatni rok był dla mnie dość szalony i intensywny. Pełen niespodzianek i sukcesów. 
Ciesze się ogromnie iż mogłam tutaj gościć. Z ogromną przyjemnością wciąż będę zaglądała na bloga by podziwiać prace zarówno dziewczyn z Teamu jak i Wasze - zgłaszane na comiesięczne konkursy.  Dziś przygotowałam tutorial na retro LO - spójrzcie :

Hey everyone. The new Design Team was anounced, so the time has come to say goodbye.
Last year was for me quite crazy and intense. Full of surprises and successes.
I'm glad that I could be here with you. With great pleasure I will still take a look on a blog to admire the work of the  girls from the Team and You ! - reported on the monthly competitions. 
Today I prepared a tutorial how to create retro LO :


1. We need to gather all supplies, protected paper by using the clear gesso.
1. Przygotowujemy wszystkie elementy, zabezpieczamy papier gesso clear.


2. Nakładamy paste strukturalną przez maskę (możemy zmienić jej kolor poprzez dodanie odrobiny farby, czarnego gessa lub innego medium które nada koloru)

2. We add the modelling paste by the mask (we can change the colour of the paste by adding the paint, black gesso or any other colourfylly media) 


3. Układamy naszą kompozycję z koronek i dodatków.
3. It's time to create our composition.


4. Przyklejamy elementy za pomocą gel medium, następnie na całość nanosimy white gesso i po wyschnięciu możemy dodać mgiełki, farby itp. 

4. We glue all elements by the glue or gel medium. Next we add the white gesso on all elements and when it's dry we can start to add Stay Sprays or any other paints. 


5. Splash the whole surface before we add the picture and next elements.
5. Chlapiemy całość zanim dodamy zdjęcie i kolejne elementy.


6. We add the picture, the flowers and the rest elements. 
6. Dodajemy zdjęcie i pozostałe elementy.


Idealnie sprawdzą się odciski z form silikonowych, które od niedawna znajdziemy w Sklepie :)
I will recommend here to use silicone molds from the store. 


Mam nadzieję, że zachęcę Was do spróbowania swoich sił w tworzeniu LO. 
Jeszcze raz dziękuje za wspaniały rok ! 
Agnieszka, Jakub - Wam życzę samych sukcesów ! Dziękuje :*

I hope you will try to create some LO projects.
Once again, thanks for a great year!
Agnieszka, Jacob - I wish you every success! Thank you :*
Paulina


środa, 15 lutego 2017

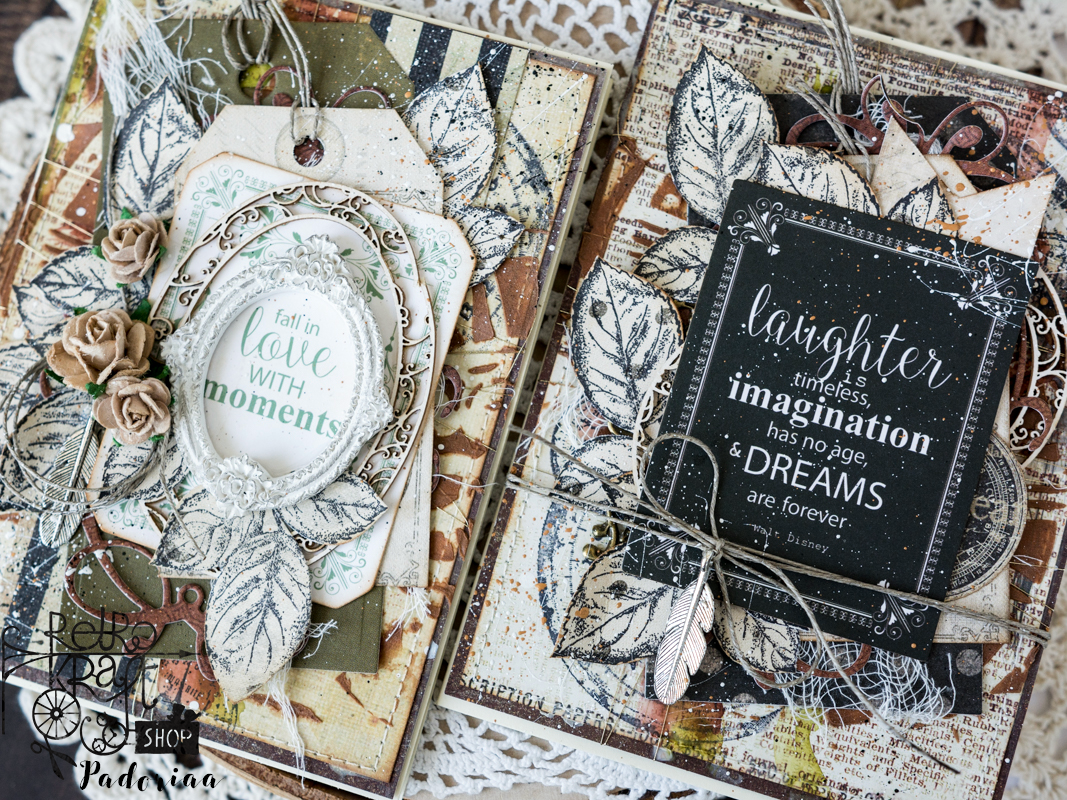
Retro Inspiracje / Retro Inspirations: Fall in love with moments

Witajcie. Dziś przygotowałam dla Was dwie kartki w stylu vintage.
Hello our blog fans. Today I prepared for you two vintage cards. 


Do ich wykonania wykorzystałam różne kolekcje papierów, stemple Carabelle oraz Finnabair, papierowe dodatki KaiserCraft,metalowe elementy oraz przepiękną ramkę Primy.

To make them I used the papers from different collections, stamps from Carabelle and Finnabair, paper add-ons from KaiserCraft, metal embellishements and a frame from Prima.  


Zabezpieczyłam papier gesso clear. Do wykonania tła wykorzystałam stemple Finnabair oraz pastę strukturalną, którą nałożyłam przez maskę. Dodałam farby oraz tusz Distress w odcieniu VintagePhoto. Stopniowo powstały kolejne warstwy.

I secured the paper with gesso clear. To make the background I used the stamps from Finnabair and texture paste applied with a mask. Next I used paints and Vintage Photo Distress spray.
I added a few layers step by step. 


Na koniec całość pochlapałam farbami w odcieniach bieli oraz złota.
In the end I splashed the cards. I used the paint in white and gold shades.

Pozdrawiam, Paulina
Hugs, Paulina


http://www.retrokraftshop.pl/pl/2577-kaisercraft-story-book-collectables.html